About the course
Today we are launching the 2018 edition of Cutting Edge Deep Learning for Coders, part 2 of fast.ai’s free deep learning course. Just as with our part 1 Practical Deep Learning for Coders, there are no pre-requisites beyond high school math and 1 year of coding experience—we teach you everything else you need along the way. This course contains all new material, including new state of the art results in NLP classification (up to 20% better than previously known approaches), and shows how to replicate recent record-breaking performance results on Imagenet and CIFAR10. The main libraries used are PyTorch and fastai (we explain why we use PyTorch and why we created the fastai library in this article).
Each of the seven lessons includes a video that’s around two hours long, an interactive Jupyter notebook, and a dedicated discussion thread on the fast.ai forums. The lessons cover many topics, including: multi-object detection with SSD and YOLOv3; how to read academic papers; customizing a pre-trained model with a custom head; more complex data augmentation (for coordinate variables, per-pixel classification, etc); NLP transfer learning; handling very large (billion+ token) text corpuses with the new fastai.text library; running and intepreting ablation studies; state of the art NLP classification; multi-modal learning; multi-task learning; bidirectional LSTM with attention for seq2seq; neural translation; customizing resnet architectures; GANs, WGAN, and CycleGAN; data ethics; super resolution; image segmentation with u-net.
The lessons
Lesson 8
Lesson 8 starts with a quick recap of what we learned in part 1, and introduces the new focus of this part of the course: cutting edge research. We talk about how to read papers, and what you’ll need to build your own deep learning box to run your experiments. Even if you’ve never read an academic paper before, we’ll show you how to do so in a way that you don’t get overwhelmed by the notation and writing style. Another difference in this part is that we’ll be digging deeply into the source code of the fastai and Pytorch libraries: in this lesson we’ll show you how to quickly navigate and build an understanding of the code. And we’ll see how to use python’s debugger to deepen your understand of what’s going on, as well as to fix bugs.
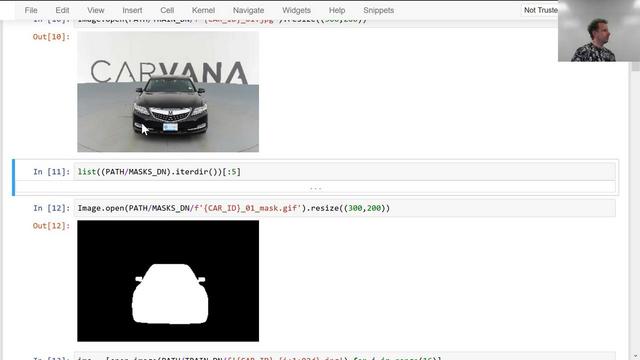
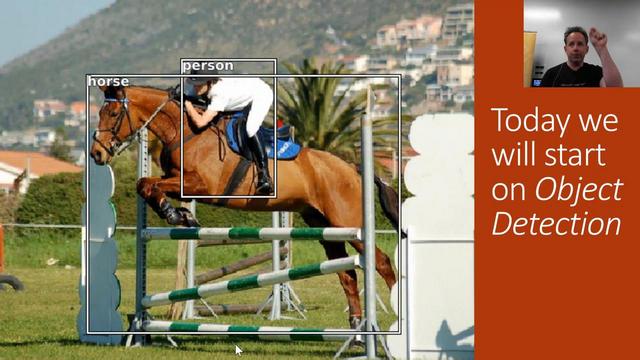
The main topic of this lesson is object detection, which means getting a model to draw a box around every key object in an image, and label each one correctly. You may be surprised to discover that we can use transfer learning from an Imagenet classifier that was never even trained to do detection! There are two main tasks: find and localize the objects, and classify them; we’ll use a single model to do both these at the same time. Such multi-task learning generally works better than creating different models for each task—which many people find rather counter-intuitive. To create this custom network whilst leveraging a pre-trained model, we’ll use fastai’s flexible custom head architecture.
Lesson 9
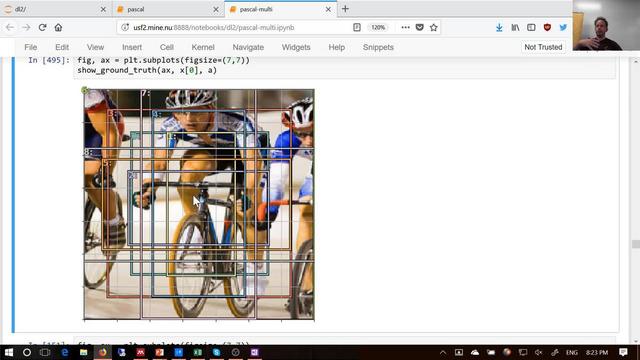
In this lesson we’ll move from single object to multi-object detection. It turns out that this slight difference makes things much more challenging. In fact, most students found this the most challenging lesson in the whole course. Not because any one piece is highly complex, but because there’s a lot of pieces, so it really tests your understanding of the foundations we’ve learnt so far. So don’t worry if a lot of details are unclear on first viewing – come back to this lesson from time to time as you complete the rest of the course, and you should find more and more of it making sense!
Our focus is on the single shot multibox detector (SSD), and the related YOLOv3 detector. These are ways to handle multi-object detection by using a loss function that can combine losses from multiple objects, across both localization and classification. They also use a custom architecture that takes advantage of the difference receptive fields of different layers of a CNN. And we’ll see how to handle data augmentation in situations like this one where the dependent variable requires augmentation too. Finally, we discuss a simple but powerful trick called focal loss which is used to get state of the art results in this field.
Lesson 10
After reviewing what we’ve learned about object detection, in lesson 10 we jump into NLP, starting with an introduction to the new fastai.text library. This is a replacement for torchtext which is faster and more flexible in many situations. A lot of this class will be very familiar—we’re covering a lot of the same ground as lesson 4. But this lesson will show you how to get much more accurate results, by using transfer learning for NLP.
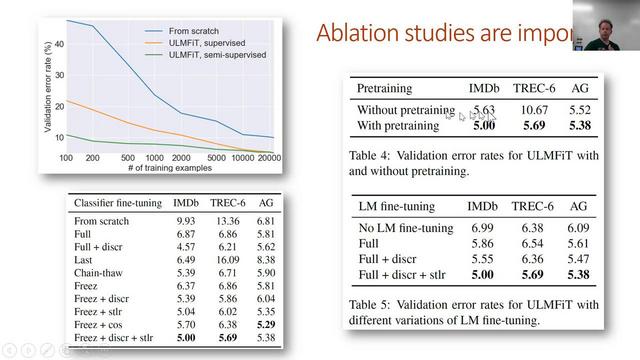
Transfer learning has revolutionized computer vision, but until now it largely has failed to make much of an impact in NLP (and to some extent has been simply ignored). In this class we’ll show how pre-training a full language model can greatly surpass previous approaches based on simple word vectors. We’ll use this language model to show a new state of the art result in text classification.
Lesson 11
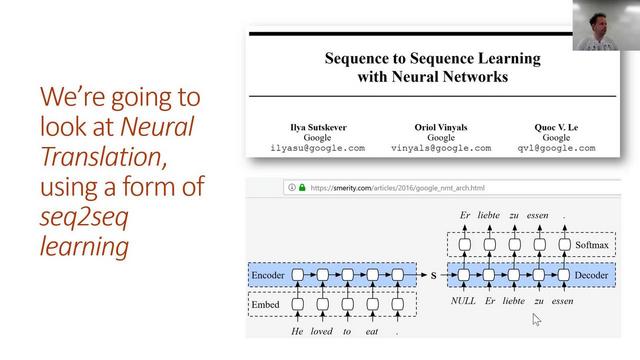
In lesson 11 we’re going to learn to translate French into English! To do so, we’ll learn how to add attention to an LSTM in order to build a sequence to sequence (seq2seq) model. But before we do, we’ll do a review of some key RNN foundations, since a solid understanding of those will be critical to understanding the rest of this lesson.
A seq2seq model is one where both the input and the output are sequences, and can be of difference lengths. Translation is a good example of a seq2seq task. Because each translated word can correspond to one or more words that could be anywhere in the source sentence, we learn an attention mechanism to figure out which words to focus on at each time step. We’ll also learn about some other tricks to improve seq2seq results, including teacher forcing and bidirectional models.
We finish the lesson by discussing the amazing DeVISE paper, which shows how we can bridge the divide between text and images, using them both in the same model!
Lesson 12
We start this lesson with a deep dive into the DarkNet architecture used in YOLOv3, and use it to better understand all the details and choices that you can make when implementing a resnet-ish architecture. The basic approach discussed here is what we used to win the DAWNBench competition!
Then we’ll learn about Generative Adversarial Networks (GANs). This is, at its heart, a different kind of loss function. GANs have a generator and a discriminator that battle it out, and in the process combine to create a generative model that can create highly realistic outputs. We’ll be looking at the Wasserstein GAN variant, since it’s easier to train and more resilient to a range of hyperparameters.
Lesson 13
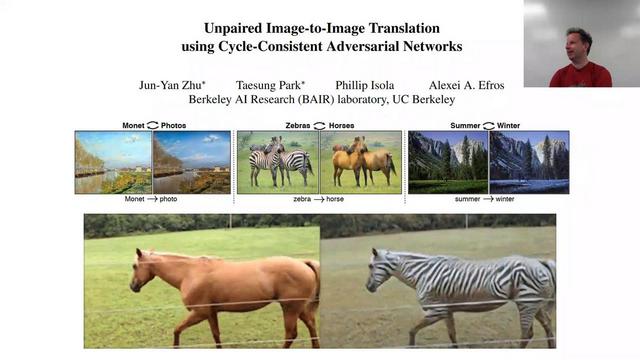
For the start of lesson 13 we’ll cover the CycleGAN, which is a breakthrough idea in GANs that allows us to generate images even where we don’t have direct (paired) training data. We’ll use it to turn horses into zebras, and visa versa; this may not be an application you need right now… but the basic idea is likely to be transferable to a wide range of very valuable applications. One of our students is already using it to create a new form of visual art.
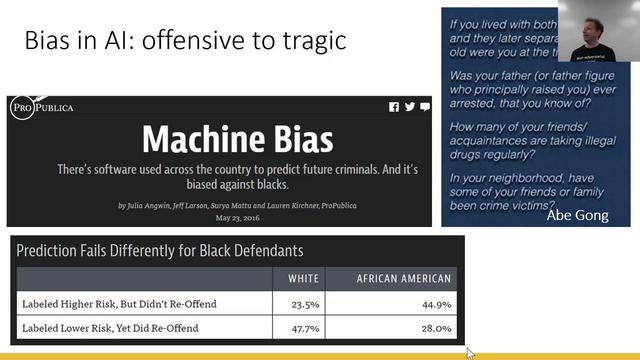
But generative models (and many other techniques we’ve discussed) can cause harm just as easily as they can benefit society. So we spend some time talking about data ethics. It’s a topic that really deserves its own whole course; whilst we can’t go into the detail we’d like in the time available, hopefully you’ll get a taste of some of the key issues, and ideas for where to learn more.
We finish the lesson by looking at style transfer, an interesting approach that allows us to change the style of images in whatever way we like. The approach requires us to optimize pixels, instead of weights, which is an interesting different way of looking at optimization.
Lesson 14
In this final lesson, we do a deep dive into super resolution, an amazing technique that allows us to restore high resolution detail in our images, based on a convolutional neural network. In the process, we’ll look at a few modern techniques for faster and more reliable training of generative convnets.
We close with a look at image segmentation, in particular using the Unet architecture, a state of the art technique that has won many Kaggle competitions and is widely used in industry. Image segmentation models allow us to precisely classify every part of an image, right down to pixel level.