Overview
Generating numbers from random distributions is a practically useful tool that any coder is likely to need at some point. C++11 added a rich set of random distribution generation capabilities. This makes it easy and fast to use random distributions, not only if you’re using C++11, but if you’re using any language that lets you interop with C++.
In this article, we’ll learn what random distributions are useful for, how they are generated, and how to use them in C++11. I’ll also show how I created new random distribution functionality for Swift by wrapping C++11’s classes as Swift classes. Whilst Swift doesn’t provide direct support for C++, I’ll show how to work around that by creating pure C wrappers for C++ classes.
Random distributions, and why they matter
If names like negative binomial and poisson are mere shadows of memories of something learned long ago, please give me a moment to try to convince you that the world of random distributions is something that deserves your time and attention.
Coders are already aware of the idea of random numbers. But for many, our toolbox is limited to uniform real and integer random numbers, and perhaps some gaussian (normal) random numbers thrown in occassionally as well. There are so many other ways of generating random numbers! In fact, you may even find yourself recreating standard random distributions without being aware of it…
For instance, let’s say you’re writing a music player, and your users have rated various songs from one star to five stars. You want to implement a “shuffle play” function, which will select songs at random, but choosing higher rated songs more often. How would you go about implementing that? The answer is: with a random distribution! More specifically, you want random numbers from a discrete distribution; that is, generate a random integer, using a set of weights where the higher weighted numbers are chosen proportionally more often.
Or perhaps you are trying to simulate the predicted queue length after adding more resources to a system. You simulate the process, becase you want to know not just the average queue length, but how often it will be bigger than some size, what the 95 percentile size will be, and so forth. You’re not sure what some of the inputs to your system might be, but you know the range of possible values, and you have a guess as to what you think is most likely. In this situation, you want random numbers from a triangular distribution; that is, generate a random float, which is normally close to your guess, and is linearly less likely further away, reducing to a probability of zero outside of the range of possible values. (This kind of simulation forms the backbone of probabilistic programming.)
There are dozens of other random distributions, including:
- Empirical distribution: pick a number at random from historical data
- Negative binomial distribution: the number of successes before a specified number of failures occurs
- Poisson distribution: which can be used to model the number of independent events of a regular frequency that happen in a fixed time period
How to generate random distributions
In general, the steps to generate a number from some random distribution are:
- Seed your generator
- Generate the next bunch of random bits using the generator
- Transform those random bits into your chosen distribution
- If you need more random numbers, return to (2)
What we normally refer as “random number generation” is really step (2): the use of a pseudorandom generator which deterministically generates a series of numbers that are as “random looking” as possible (i.e. not correlated with each other, well spread out, and so forth). The pseudorandom generator is some function with these properties, such as mersenne twister. To start off the series, you need some seed; that is, the first number to pass to the generator. Most operating systems have some way of generating a random seed, such as /dev/random on Linux and Mac, which uses environmental input such as noise from device drivers to get a number that should be truely random.
Then in step 3 we transform the random bits created by our pseudorandom generator into something that has the distribution we need. There are universally applicable methods for this, such as inverse transform sampling, which transform a uniform random number into any given distribution. There are also faster methods specific to a distribution, such as the Box-Muller transform which creates gaussian (normal) random numbers from a uniform generator.
To create more random numbers, you don’t need to go back to /dev/random, since you already have a pseudorandom generator set up now. Instead, you just grab the next number from your generator (step (2)), and pass that to your distribution generating transform (step (3)).
How this works in C++
C++11 includes, in the <random> standard library header, functionality for each of the steps above. Step (1) is achieved by simply creating a random_device (I’m not including the std:: prefix in this article; you would either type std::random_device or add using namespace std to the top of your C++ file). You then pass this to the constructor of one of various pseudorandom generators provided, such as mt19937, which is the mersenne twister generator; that’s step (2). Then you construct a random distribution object using an appropriate class, such as discrete_distribution, passing in whatever arguments are needed by that distribution (e.g. for discrete_distribution you pass in a list of weights for each possible value). Finally, call that object (it supports the () operator, so it’s a functor, known as callable in Python) passing in the pseudorandom generator you created. Here’s a complete example from the excellent cppreference.com.
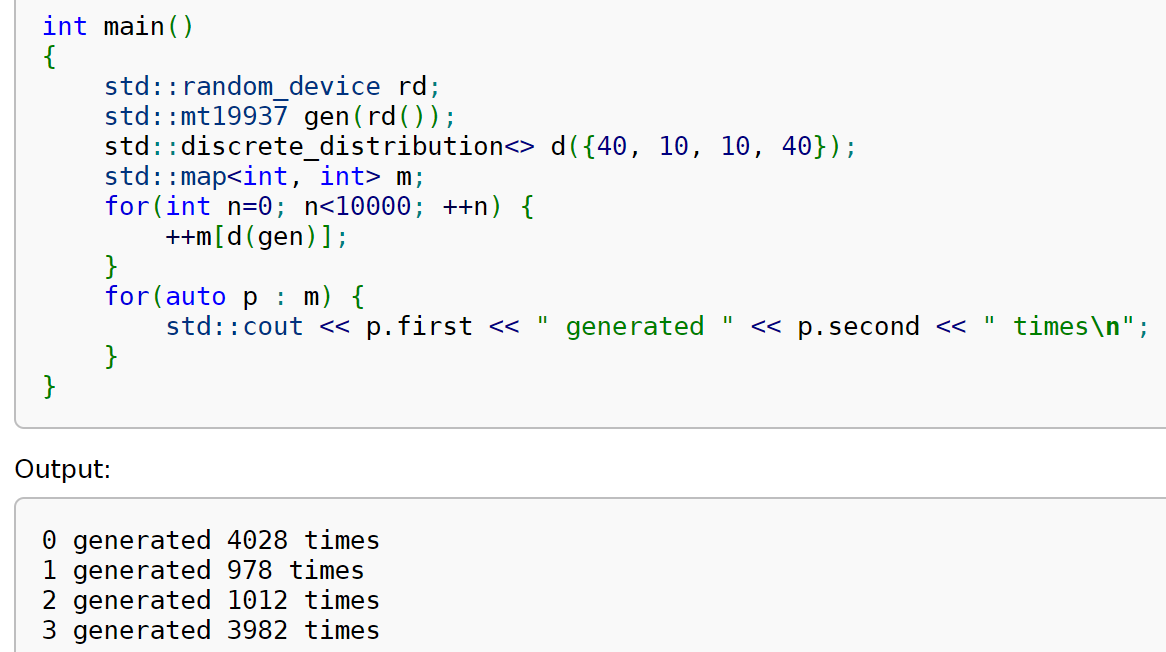
If you thought that C++ code had to be verbose and complicated, this example might just make you rethink your assumptions! As you can see, each step maps nicely to the overview of the random distribution process described in the previous section. (BTW: if you’re interested in learning modern C++, cppreference.com has an extraordinary collection of carefully designed examples for every part of the C++ standard library; it’s perhaps the best place to learn how to use the language effectively in a hands on way. You can even edit the examples and run them online!)
The distributions provided by C++11 are:
- Integer generation:
uniform_int_distribution,binomial_distribution,negative_binomial_distribution,geometric_distribution,poisson_distribution - Real generation:
uniform_real_distribution,exponential_distribution,gamma_distribution,weibull_distribution,normal_distribution,lognormal_distribution,chi_squared_distribution,cauchy_distribution,fisher_f_distribution,student_t_distribution - Boolean generation:
bernoulli_distribution
How this works in Swift
Although Swift 4 now provides some basic random number support, it still doesn’t provide any non-uniform distributions. Therefore, I’ve made all of the C++11 random distributions available to Swift, as part of my BaseMath library. For more information on why and how I created this library, see High Performance Numeric Programming with Swift. I’ll show how I built this wrapper in a moment, but first let’s see how to use it. Here’s the same function that we saw in C++, converted to Swift+BaseMath:
let arr = Int.discrete_distribution([40, 10, 10, 40])[10000]
let counts = arr.reduce(into: [:]) { $0[$1, default:0] += 1 }
counts.sorted(by:<).forEach { print("\($0) generated \($1) times") }
As you see, the generation of the random numbers in Swift can be boiled down using BaseMath to just: Int.discrete_distribution([40, 10, 10, 40])[10000]. We can do this more concisely than C++11 because we don’t surface as many options and details. BaseMath simply assumes you want to use the standard seeding method, and use the mt19937 mersenne twister generator.
The names of the distributions in BaseMath are exactly the same as in C++11, and you simply prefix each name with the type you wish to generate (either Int or Int32 for integer distributions, or Double or Float for real distributions). Each distribution has an init which matches the same name and types as the C++11 distribution constructor. This returns a Swift object with a number of methods. The C++11 objects, as discussed, provide the () (functor) operator, but unfortunately that operator can not be overloaded in Swift. Therefore instead we borrow Swift’s subscript special method to give us the equivalent behavior. The only difference is we have to use [] instead of (). If you just use the empty subscript [] then BaseMath will return a single random number; if you use an Int, such as [10000] then BaseMath will return an array. (There are also methods to generate buffer pointers and aligned storage.) Using subscript instead of a functor may feel a bit odd at first, but it’s a perfectly adequte way to get around Swift’s limitation. I’m going to call this a quasi-functor; that is, something that behaves like a functor, but is called using [...].
Wrapping C++ with Swift
In order to make the C++11 random distributions available to Swift, I needed to do two things:
- Wrap the C++ classes in a C API, since Swift can’t interop directly with C++
- Wrap the C API with Swift classes
We’ll look at each step in turn:
Wrap C++ classes in C
The C wrapper code is in CBaseMath.cpp. The mt19937 mersenne twister generator will be wrapped in a Swift class called RandGen, so the C functions wrapping this class all have the RandGen_ prefix. Here’s the code for the C wrappers (note that the wrappers can use C++ features internally, as long as the interface in the header file is plain C):
struct RandGenC:mt19937 {};
typedef struct RandGenC RandGenC;
RandGenC* RandGen_create() {
  return (RandGenC*)(new mt19937(random_device()()));
}
void RandGen_destroy(RandGenC* v) {
  delete(v);
}
The pattern for each class we wrap will be similar to this. We’ll have at least:
- A
structwhich derives from the C++ class to wrap (struct RandGenC), along with a typedef to allow us to use this name directly. By using a struct instead ofvoid*we can call methods directly in C++, but can hide templates and other C++ internals from our pure C header file - A
_createfunction which constructs an object of this class and returns a pointer to it, cast to our struct type - A
_destroyfunction that deletes that object
In our header, we’ll have each of the functions listed, along with the typedef. Anything importing this C API, including our Swift code, won’t actually know anything about what the struct actually contains, so we won’t be able to use the type directly (since its size and layout isn’t provided in the header). Instead, we’ll simply use opaque pointers in code that uses this.
Here’s the code for the wrappers for a distribution; it looks nearly the same:
struct uniform_int_distribution_intC:uniform_int_distribution<int> {};
typedef struct uniform_int_distribution_intC uniform_int_distribution_intC;
uniform_int_distribution_intC* uniform_int_distribution_int_create(int a,int b) {
  return (uniform_int_distribution_intC*)(new uniform_int_distribution<int>(a,b));
}
void uniform_int_distribution_int_destroy(uniform_int_distribution_intC* v) {
  delete(v);
}
int uniform_int_distribution_int_call(uniform_int_distribution_intC* p, RandGenC* g) {
  return (*p)(*g);
}
The main difference is the addition of a _call function to allow us to actually call the method. Also, because the type is templated, we have to create a separate set of wrappers for each template type we want to support; the above shows an example for <int>. Note that this type needs to be included in the name of each function, since C doesn’t support overloading.
Of course, this all looks rather verbose, and we wouldn’t want to write this all out by hand for every distribution. So we don’t! Instead we use gyb templates to create them for us, and also to auto-generate the header file. Time permitting, we’ll look at that in more detail in the future. But for now, you can check the template’s source code.
Wrap C API in Swift
Now that we’ve got our C API, we can recreate the original C++ class easily in Swift, e.g.:
public class RandGen {
  public let ptr:OpaquePointer?
  public init() { ptr=RandGen_create() }
  deinit { RandGen_destroy(ptr) }
}
As you see, we simply call our _create function in init, and _destroy in deinit. As discussed in the previous section, our C API users don’t know anything about the internals of our struct, so Swift simply gives us an OpaquePointer.
We create similar wrappers for each distribution (which also define subscript, which will call our _call function), plus extending the numeric type with an appropriate static wrapper, e.g.:
extension Int32 {
  public static func uniform_int_distribution(_ g_:RandGen, _ a:Int32, _ b:Int32)
      -> uniform_int_distribution_Int32 {
    return uniform_int_distribution_Int32(g_, a,b)
  }
}
Thread-safe generators
Having to construct and pass in a RandGen object isn’t convenient, particularly when we have to deal with the complexities of thread safety. C++ libraries are not, in general, thread safe; this includes C++11 random generators. So we have to be careful that we don’t share a RandGen object across threads. As discussed in my previous High Performance Numeric Programming with Swift article, we can easily get thread-safe objects by using Thread Local Storage. I added this property to RandGen:
static var stored:RandGen {
  if let r = Thread.current.threadDictionary["RandGen"] as? RandGen { return r }
  return Thread.setToTLS(RandGen(), "RandGen")
}
This lets use add versions of the following to each distribution class, which allows users to never have to think about creating or using the RandGen class.
public convenience init(_ a:Int32, _ b:Int32) {
  self.init(RandGen.stored, a,b)
}
Extensions using protocols and BaseMath
The above steps give us the functionality of generating a single random number at a time. In order to generate a collection, we can add a Distribution protocol which each distribution conforms to, and extend it as follows:
public protocol Distribution:Nullary {
  subscript()->Element {get}
  subscript(n:Int)->[Element] {get}
}
extension Distribution {
  public subscript(n:Int)->[Element] {
    return [Element].fill(self, n)
  }
}
As you see, we leverage the BaseMath method fill, which calls a function or quasi-functor n times and returns a new BaseVector (in this case, an Array) with the results of each call.
You might be wondering about the protocol Nullary that’s mentioned above. Perhaps you’ve already heard of unary (a function or operator with one argument), binary (two arguments), and ternary); less known, but equally useful, is the term nullary, which is simply a function or operator with no arguments. As discussed earlier, Swift doesn’t support overloading the () operator, so we add a Nullary protocol using subscript:
public protocol Nullary {
  associatedtype Element:SignedNumeric
  subscript()->Element {get}
}
Try it out!
If you’re a C++ or Swift programmer, try out some of these random distributions—perhaps you could even experiment with creating some simulations and entering the world of probabilistic programming! Or if you’re a Swift programmer that want to use functionaity in a C++ library, try wrapping it with an idiomatic Swift API and make it available as a Swift package for anyone to use.