This is part 1 of a series on fastec2. To learn how to run and monitor long-running tasks with fastec2 check out part 2.
AWS EC2 is a wonderful system; it allows anyone to rent a computer for a few cents an hour, including a fast network connection and plenty of disk space. I’m particularly grateful to AWS, because thanks to their Activate program we’ve got lots of compute credits to use for our research and development at fast.ai.
But if you’ve spent any time working with AWS EC2, then for setting it up you’ve probably found yourself stuck between the slow and complex AWS Console GUI, and the verbose and clunky command line interface (CLI). There are various tools available to streamline AWS management, but they tend towards the power user end of the spectrum, written for people that are deploying dozens of computers in complex architectures.
Where’s the tool for regular folks? Folks who just want to launch a computer or two for getting some work done, and shutting it down when it’s finished? Folks who aren’t really that keen to learn a whole bunch of AWS-specific jargon about VPCs and Security Groups and IAM Roles and oh god please just make it go away…
Contents
- Overview
- Installation and configuration
- Creating your initial on-demand instance
- Creating your Amazon Machine Instance (AMI)
- Launching and connecting to your instance
- Launching a spot instance
- Using the interactive REPL and ssh API
Since I’m an extremely regular folk myself, I figured I better go write that tool. So here it is: fastec2. Is it for you? Here’s a summary of what it is designed to make easy (‘instance’ here simply means ‘AWS computer’):
- Launch a new on-demand or spot instance
- See what instances are running
- Start an instance
- Connect to a named instance using ssh
- Run a long-running script in a spot instance and monitor and save results
- Create and use volumes and snapshots, including automatic formatting/mounting
- Change the type of an instance (e.g. add or remove a GPU)
- See pricing for on-demand and spot instance types
- Access through either a standard command line or through a Jupyter Notebook API
- Tab completion
- IPython command line interactive REPL available for further exploration
I expect that this will be most useful to people who are doing data analysis, data collection, and machine learning model training. Note that fastec2 is not designed to make it easy to manage huge fleets of servers on set up complex network architectures, or to help with deployment of applications. If you’re wanting to do that, you might want to check out Terraform or CloudFormation.
To see how it works, let’s do a complete walkthru of creating a new Amazon Machine Image (AMI), then lauching an AMI from this instance, and connecting to it. We’ll also see how to launch a spot instance, running a long-running script on it, and collect the results of the script. I’m assuming you already have an AWS account, and know the basics of connecting to instances with ssh. (If you’re not sure about this bit, first you should follow this tutorial on DataCamp.) Note that much of the coolest functionality in fastec2 is being provided by the wonderful Fire, Paramiko, and boto3 libraries—so a big thanks to all the wonderful people that made these available!
Overview
The main use case that we’re looking to support with fastec2 is as follows: you want to interactively start and stop machines of various types, each time getting the same programs, data, and configuration automatically. Sometimes you’ll create an on-demand image and start and stop it as required. You may also want to change the instance type occassionally, such as adding a GPU, or increasing the RAM. (This can be done instantly with a single command!) Sometimes you’ll fire up a spot instance in order to run a script and save the results (such as for training a machine learning model, or completing a web scraping task).
The key to having this work well is to set up an AMI which is set up just as you need it. You may think of an AMI as being something that only sysadmin geniuses at Amazon build for you, but as you’ll see it’s actually pretty quick and easy. By making it easy to create and use AMIs, you can then easily create the machines you need, when you need them.
Everything in fastec2 can also be done through the AWS Console, and through the official AWS CLI. Furthermore, there’s lots of things that fastec2 can’t do—it’s not meant to be complete, it’s meant to be convenient for the most commonly used functionality. But hopefully you’ll discover that for what it provides, it makes it easier and faster than anything else out there…
Installation and configuration
You’ll need python 3.6 or later - we highly recommend installing Anaconda if you’re not already using python 3.6. It lets you have as many different python versions as you want, and different environments, and switch between them as needed. To install fastec2:
pip install git+https://github.com/fastai/fastec2.gitYou can also save some time by installing tab-completion for your shell. See the readme for setup steps for this. Once installed, hit Tab at any point to complete a command, or hit Tab again to see possible alternatives.
fastec2 uses a python interface to the AWS CLI to do its work, so you’ll need to configure this. The CLI uses region codes, instead of the region names you see in that console. To find out the region code for the region you wish to use, fastec2 can help. To run the fastec2 application type fe2, along with a command name and any required arguments. The command region will show the first code that matches the (case-sensitive) substring you provide, eg (note that I’m using ‘$’ to indicate the lines you type, and other lines are the responses):
$ fe2 region Ohio
us-east-2
Now that you have your region code, you can configure AWS CLI:
$ aws configure
AWS Access Key ID: XXX
AWS Secret Access Key: XXX
Default region name: us-east-2
For information on setting this up, including getting your access keys for AWS, see Configuring the AWS CLI.
Creating your initial on-demand instance
Life is much easier when you can rapidly create new instances which are all set up just how you like them, with the right software installed, data files downloaded, and configuration set up. You can do this by creating an AMI, which is simply a “frozen” version of a computer that you’ve set up, and can then recreate as many times as you like, nearly instantly.
Therefore, we will first set up an EC2 instance with whatever we’re going to need (we’ll call this your base instance). (You might already have an instance set up, in which case you can skip this step).
One thing that will make things a bit easier is if you ensure you have a key pair on AWS called “default”. If you don’t, go ahead and upload or create one with that name now. Although fastec2 will happily use other named keys if you wish, you’ll need to specify the key name every time if you don’t use “default”. You don’t need to make your base instance disk very big, since you can always use a larger size later when you launch new instances using your AMI. Generally 60GB is a reasonable size to choose.
To create our base image, we’ll need to start with some existing AMI that contains a Linux distribution. If you already have some preferred AMI that you use, feel free to use it; otherwise, we suggest using the latest stable Ubuntu image. To get the AMI id for the latest Ubuntu, type:
$ fe2 get-ami - id
ami-0c55b159cbfafe1f0
This shows a powerful feature of fastec2: all commands that start with “get-” return an AWS object, on which you can call any method or property (each of these commands also has a version without the get- prefix, which prints a brief summary of the object instead of returning it). Type your method or property name after a hyphen, as shown above. In this case, we’re getting the ‘id’ property of the AMI object returned by get-ami (which defaults to the latest stable Ubuntu image; see below for examples of other AMIs). To see the list of properties and methods, simply call the command without a property or method added:
$ fe2 get-ami -

Usage:           fe2 get-ami
                 fe2 get-ami architecture
                 fe2 get-ami block-device-mappings
                 fe2 get-ami create-tags
                 fe2 get-ami creation-date
                 ...
Now you can launch your instance—this creates a new “on-demand” Linux instance, and when complete (it’ll take a couple of minutes) it will print out the name, id, status, and IP address. The command will wait until ssh is accessible on your new instance before it returns:
$ fe2 launch base ami-0c55b159cbfafe1f0 50 m5.xlarge
base (i-00c7f2f81a841b525 running): 18.216.25.57
The fe2 launch command takes a minimum of 4 parameters: the name of the instance to create, the ami to use (either id or name—here we’re using the AMI id we retrieved earlier), the size of the disk to create (in GB), and the instance type. You can learn about the different instance types available from this AWS page. To see the pricing of different instances, you can use this command (replace m5 with whichever instance series you’re interested in; note that currently only US prices are displayed, and they may not be accurate or up to date—use the AWS web site for full price lists):
$ fe2 price-demand m5
["m5.large", 0.096]
["m5.metal", 4.608]
["m5.xlarge", 0.192]
["m5.2xlarge", 0.384]
["m5.4xlarge", 0.768]
["m5.12xlarge", 2.304]
["m5.24xlarge", 4.608]
With our instance running, we can now connect to it with ssh:
$ fe2 connect base
Welcome to Ubuntu 18.04.2 LTS (GNU/Linux 4.15.0-1032-aws x86_64)

Last login: Fri Feb 15 22:10:28 2019 from 4.78.240.2

ubuntu@ip-172-31-13-138:~$ |
Now you can configure your base instance as required, so go ahead and apt install any software you want, copy over data files you’ll need, and so forth. In order to use some features of fastec2 (discussed below) you’ll need tmux and lsyncd installed in your AMI, so go ahead and install then now (sudo apt install -y tmux lsyncd). Also, if you’ll be using the long-running script functionality in fastec2 you’ll need a private key in your ~/.ssh directory which has permission to connect to another instance to save results of the script. So copy your regular private key over (if it’s not too sensitive) or create a new one (type: ssh-keygen) and grab the ~/.ssh/id_dsa.pub file it creates.
Check: make sure you’ve done the following in your instance before you make it into an AMI: installed
lsyncdandtmux; copied over your private key.
If you want to connect to jupyter notebook, or any other service on your instance, you can use ssh tunneling. To create ssh tunnels, add an extra argument to the above fe2 connect command, passing in either a single int (one port) or an array (multiple ports), e.g.:
# Tunnel to just jupyter notebook (running on port 8888)
fe2 connect od1 8888
# Two tunnels: jupyter notebook, and a server running on port 8008
fe2 connect od1 [8888,8008]
This doesn’t do any fancy fowarding between different machines on the networks - it’s just a direct connection from the computer you run fe2 connect on, to your computer you’re ssh’ing to. So generally you’ll run this on your own PC, and then access (for Jupyter) http://localhost:8888 in your browser.
Creating your Amazon Machine Instance (AMI)
Once you’ve configured your base instance, you can create your own AMI:
$ fe2 freeze base
ami-01b7ceef9767a163a
Here ‘freeze’ is the command, and ‘base’ is the argument. Replace myname with the name of your base instance that you wish to “freeze” into an AMI. Note that your instance will be rebooted during this process, so ensure that you’ve saved any open documents and it’s OK to shut down. It might take 15 mins or so for the process to complete (for very large disks of hundreds of GB it could take hours). To check on progress, either look in the AMIs section of the AWS console, or type this command (it will display ‘pending’ whilst it is still creating the image):
$ fe2 get-ami base - state
pending
(As you’ll see, this is using the method-calling functionality of fastec2 that we saw earlier.)
Launching and connecting to your instance
Now you’ve gotten your AMI, you can launch a new instance using that template. It only take a couple of minutes for your new instance to be created, as follows:
$ fe2 launch inst1 base 80 m5.large
inst1 (i-0f5a3b544274c645f running): 18.191.111.211
We’re calling our new instance ‘inst1’, and using the ‘base’ AMI we created earlier. As you can see, the disk size and instance type need not be the same as you used when creating the AMI (although the disk size can’t be smaller than the size you created with). You can see all the options available for the launch command; we’ll see how to use the iops and spot parameters in the next section:
$ fe2 launch -- --help

Usage: fe2 launch NAME AMI DISKSIZE INSTANCETYPE [KEYNAME] [SECGROUPNAME] [IOPS] [SPOT]
       fe2 launch --name NAME --ami AMI --disksize DISKSIZE --instancetype INSTANCETYPE
         [--keyname KEYNAME] [--secgroupname SECGROUPNAME] [--iops IOPS] [--spot SPOT]
Congratulations, you’ve launched your first instance from your own AMI! You can repeat the previous fe2 launch command, just passing in a different name, to create more instances, and ssh to each with fe2 connect <name>. To shutdown an instance, enter in the terminal of your instance:
sudo shutdown -h now…or alternatively enter in the terminal of your own computer (change inst1 to the name of your instance):
fe2 stop inst1If you replace stop with terminate in the above command it will terminate your instance (i.e. it will destroy it, and by default will remove all of your data on the instance; when terminating the instance, fastec2 will also remove its name tag, so it’s immediately available to reuse). If you want to have fastec2 wait until the instance is stopped, use this command (otherwise it will happen automatically in the background):
$ fe2 get-instance inst1 - wait-until-stoppedHere’s a really handy feature: after you’ve stopped your instance, you can change it to a different type! This means that you can do your initial prototyping on a cheap instance type, and then run your big analysis on a super-fast machine when you’re ready.
$ fe2 change-type inst1 p3.8xlargeThen you can re-start your instance and connect to it as before:
$ fe2 start inst1
inst1 (i-0f5a3b544274c645f running): 52.14.245.85

$ fe2 connect inst1
Welcome to Ubuntu 18.04.2 LTS (GNU/Linux 4.15.0-1032-aws x86_64)
With all this playing around with instances you may get lost as to what you’ve created and what’s actually running! To find out, just use the instances command:
$ fe2 instances
spot1 (i-0b39947b710d05337 running): 3.17.155.171
inst1 (i-0f5a3b544274c645f stopped): No public IP
base (i-00c7f2f81a841b525 running): 18.216.25.57
od1 (i-0a1b47f88993b2bba stopped): No public IP
The instances with “No public IP” will automatically get a public IP when you start them. Generally you won’t need to worry about what the IP is, since you can fe2 connect using just the name; however you can always grab the IP through fastec2 if needed:
$ fe2 get-instance base - public-ip-address
18.216.25.57
Launching a spot instance
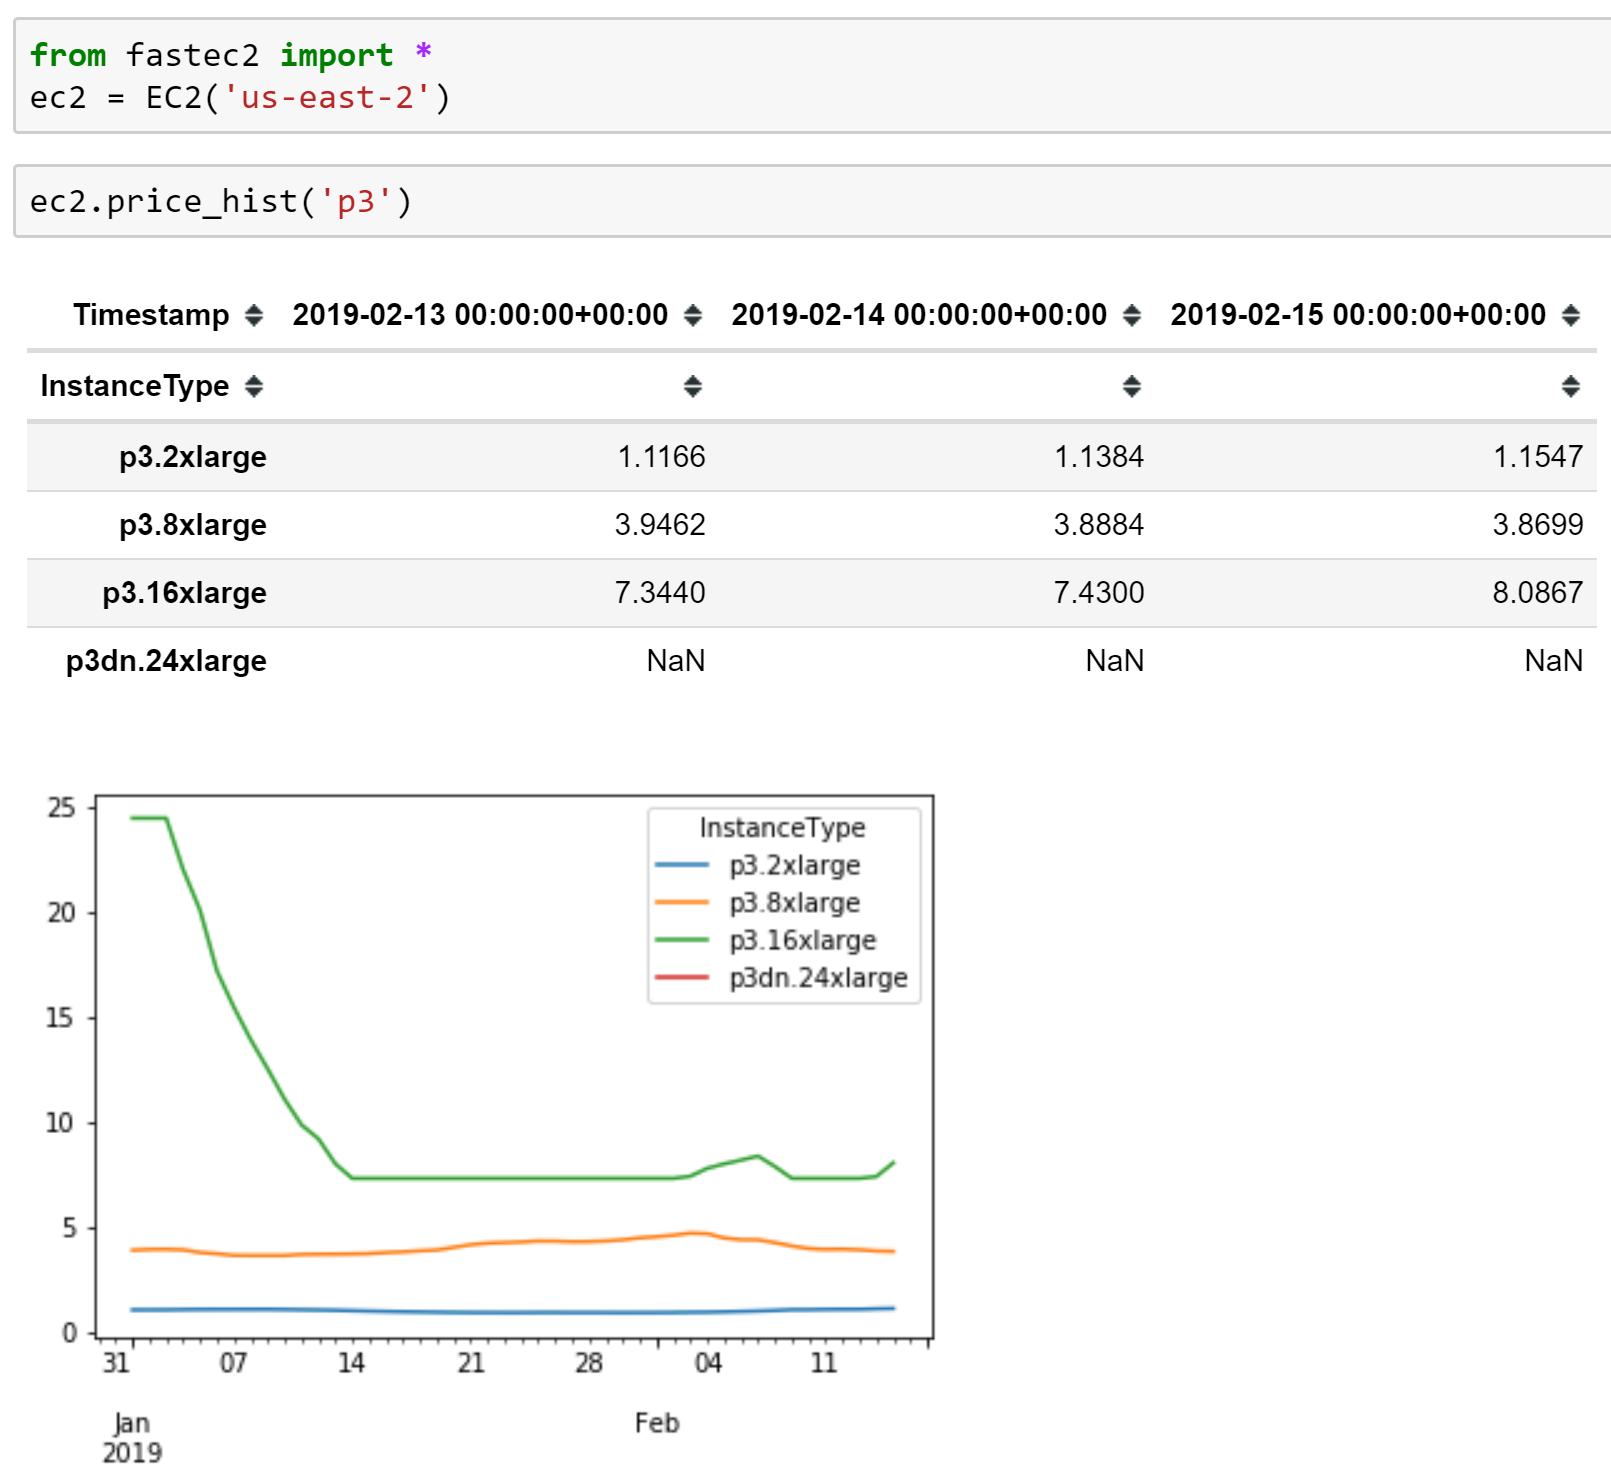
Spot instances can be 70% (or more) cheaper than on-demand instances. However, they may be shut down at any time, may not always be available, and all data on their root volume is deleted when they are shut down (in fact, they can only be terminated; they can’t be shut down and restarted later). Spot instance prices vary over time, by instance type, and by region. To see the last 3 days’ pricing for instances in a group (in this case, for p3 types), enter:
$ fe2 price-hist p3
Timestamp      2019-02-13  2019-02-14  2019-02-15
InstanceType
p3.2xlarge         1.1166      1.1384      1.1547
p3.8xlarge         3.9462      3.8884      3.8699
p3.16xlarge        7.3440      7.4300      8.0867
p3dn.24xlarge         NaN         NaN         NaN
Let’s compare to on-demand pricing:
$ fe2 price-demand p3
["p3.2xlarge", 3.06]
["p3.8xlarge", 12.24]
["p3.16xlarge", 24.48]
["p3dn.24xlarge", 31.212]
That’s looking pretty good! To get more detailed price graphs, check out the spot pricing tool on the AWS console, or else try using the fastec2 jupyter notebook API. This API is identical to the fe2 command, except that you create an instance of the EC2 class (optionally passing a region to the constructor), and call methods on that class. (If you haven’t used Jupyter Notebook before, then you should definitely check it out, because it’s amazingly great! Here’s a helpful tutorial from the kind folks at DataQuest to get you started.) The price-demand method has an extra feature when used in a notebook that prints the last few weeks prices in a graph for you (note that hyphens must be replaced with underscores in the notebook API).
To launch a spot instance, just add --spot to your launch command:
$ fe2 launch spot1 base 80 m5.large --spot
spot1 (i-0b39947b710d05337 running): 3.17.155.171
Note that this is only requesting a spot instance. It’s possible that no capacity will be available for your request. In that case, after a few minutes you’ll see an error from fastec2 telling you that the request failed. We can see that the above request was successful, because it’s printed out a message showing the new instance is “running”.
Remember: if you stop this spot instance it will be terminated and all data will be lost! And AWS can decide to shut it down at any time.
Using the interactive REPL and ssh API
How do you know what methods and properties are available? And how can you access them more conveniently? The answer is: use the interactive REPL! A picture tells a thousand words:…
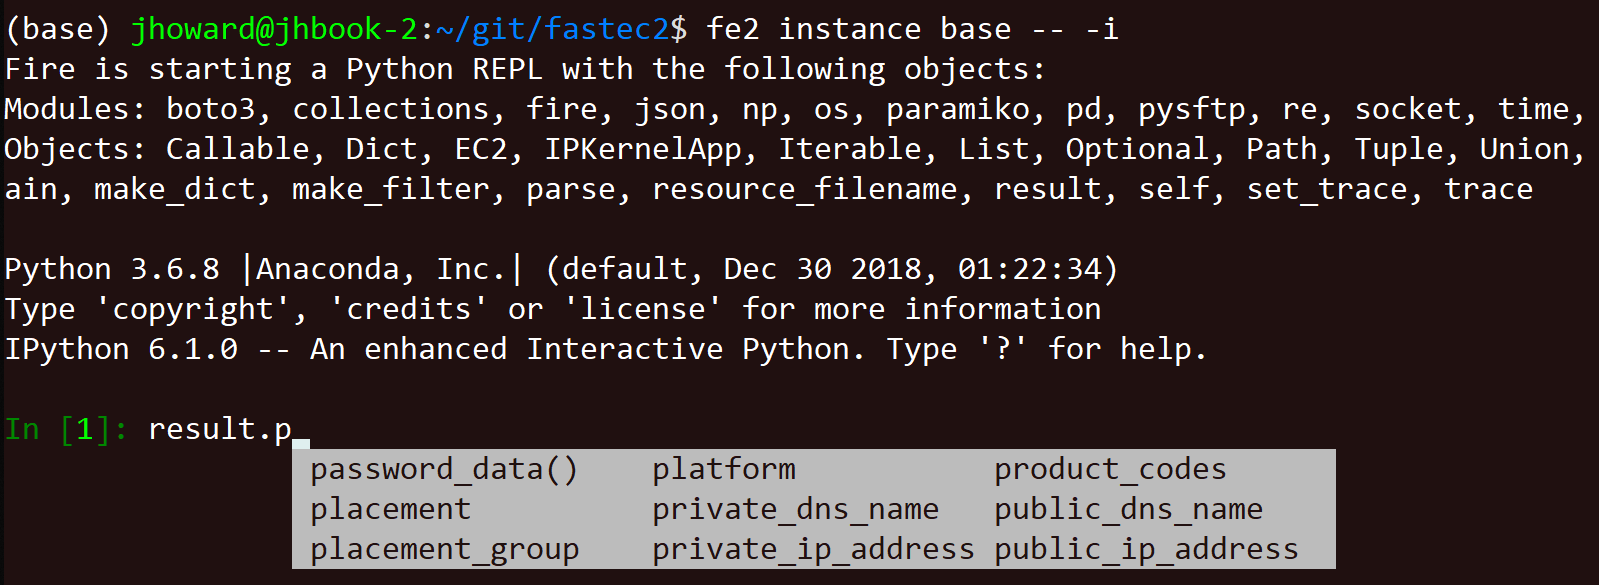
If you add -- -i to the end of a command which returns an object (which is currently the instance, get-ami, and ssh commands) then you’ll be popped in to an IPython session with that object available in the special name result. So just type result. and hit Tab to see all the methods and properties available. This is a full python interpreter, so you can use the full power of python to interact with this object. When you’re done, hit Ctrl-d twice to exit.
One interesting use of this is to experiment with the ssh command, which provides an API to issue commands to the remote instance via ssh. The object returned by this command is a standard Paramiko SSHClient, with a couple of extra goodies. One of those goodies is send(cmd), which sends ‘cmd’ to a tmux session (that’s automatically started) on the instance. This is mainly designed for you to use from scripts, but you can experiment with it via the REPL, as shown below.
If you just want to explore the fastec2 API interactively, the easiest way is by launching the REPL using fe2 i (you can optionally append a region id or part of a region name). A fastec2.EC2 object called e will be automatically created for you. Type e. and hit Tab to see a list of options. IPython is started in smart autocall mode, which means that you often don’t even need to type parentheses to run methods. For instance:
$ fe2 i Ohio
IPython 6.1.0 -- An enhanced Interactive Python. Type '?' for help.

In [1]: e.instances
inst1 (i-0f5a3b544274c645f m5.large running): 18.222.175.103
base (i-00c7f2f81a841b525 m5.xlarge stopped): No public IP
od1 (i-0a1b47f88993b2bba t3.micro running): 18.188.162.203

In [2]: i=e.get_instance('od1')

In [3]: i.block_device_mappings
Out[3]:
[{'DeviceName': '/dev/sda1',
  'Ebs': {'AttachTime': datetime.datetime(2019, 2, 14, 9, 30, 16),
   'DeleteOnTermination': True,
   'Status': 'attached',
   'VolumeId': 'vol-0d1b1a47539d5bcaf'}}]
fastec2 provides many convenient methods for managing AWS EC2, and also adds functionalty to make SSH and SFTP easier to use. We’ll look at these features of the fastec2 API in more detail in a future article.
If you want to learn how to run and monitor long-running tasks with fastec2 check out part 2 of this series, where we’ll also see how fastec2 helps to create and use volumes and snapshots, including automatic formatting/mounting.